When I tried to make a list of things that I wished to do two years ago, working with an NGO was one of them. Having no clear ideas of what to do and whom to approach, I looked up on the internet as usual. I came across a few NGOs listed on the web, and spoke to two-three of them. Of all of them, what quickly came as my choice for association was Youth For Seva(YFS).

YFS had a different model of working and did not work on any projects on their own. It was an organization trying to leverage the power of web to connect volunteers and NGOs by facilitating volunteer registration through their website. Once a volunteer registers, someone from YFS would get in touch and understand his or her interests, and accordingly redirect the registrant to one of the associated NGOs.
When I first spoke to them, they had just started with two people doing all the work. Venkatesh Murthy, the founder, had rich experience in working with NGOs and independent social work. Murthy, along with Akhilesh, one of the early members of YFS, roped in NGOs, counseled every registered volunteer personally and routed them based on interests. But within a year, Youth For Seva was growing too fast and they had to have people working full time. Murthy himself decided to quit his work in the IT industry and decided to work full time with YFS for a few years.
In the course of their growth in the two years, they innovated many ways to ensure scalability. The operations were divided into zones within Bangalore, and each zone had a moderator who took care of the activities in the area. They got college students to spend time working during vacations and help with operations. They also roped in a few people to work full time at YFS.

Over last two years, more than a thousand users registered with Youth For Seva, occasionally making it hard to place them with NGOs. A large number of net-savvy people from the IT industry who wanted to make a difference to the society, but did not know how to, found YFS as a good platform to begin with. Trying to place the growing number of volunteers, YFS decided to take up projects on their own.
Today, YFS works with 3,000 volunteers and 30 NGOs. Besides working with other NGOs YFS also conceives and executes projects on their own. Volunteers are working with 30 government schools independently. The current project they are working on involves sponsoring the education of 1500 underprivileged children who have been already been identified through aptitude tests. The sponsorship costs Rs.500/- per month or a lump sum amount of Rs.6,000/- for the year. Read Sponsor A Child microsite for details. Donors can donate online through bank transfer, send a cheque, or contact coordinators for more details.
If you would like to volunteer with Youth For Seva, register with your details on their website.
Today’s Thursday Travel Photography is slightly technical, but is important to know for everyone who shoots with a digital camera. If you are already familiar with white balance adjustments, feel free to skip this section.
The second part of this article has weekly image reviews. If you would like to have your images reviewed to know what worked well and how it could have been improved, choose some of your best images and post them on group pool of India Travel and Photography. Don’t forget to tag them as itpcritique, so they can be chosen for review. You can also post your questions related to photography as a comment to this post, or in India Travel and Photography group discussion. I will answer them in next week’s article.
WHITE BALANCE
Sometimes you would have noticed that a picture you have taken has a tint of blue or yellow. Although it is unnoticeable or doesn’t exist in most pictures, a few images may turn out so blue that it spoils the photo, and makes you wonder where did it come from. The answer lies in white balance.
Most light sources that we normally see, except daylight, tends to have a tint. For example, tungsten light has a yellow tint. Early morning light before sunrise tends to have a bluish hue. Evening sun, before and after sunset has a colour varying from orange to red. Sometimes when the colors are very saturated, we notice it easily, such as in case of a colourful sunset. But after a few minutes of getting adjusted, our eyes adapt well enough that we don’t explicitly notice the tint.
However, when taking pictures, the camera needs to make some compensations to ensure that photograph doesn’t register a tint influenced by the light source. Nearly all digital cameras have inbuilt processing capacity to compensate for the light hues, ensuring that the picture you have taken simulates the colours that the objects would have in a neutral light source. This is called White Balance Compensation.
Sometimes cameras may not be able to compensate accurately in some environment, resulting in incorrect and artifical looking hues in the picture. Look at the example below.


The above image is of a rock in the sea, taken in the evening hours. The picture to the left is straight out of camera with auto White Balance settings. You can see an obvious tint in the image. The picture to the right has gone through some corrections on the computer to fix the white balance. As you can realize, the image to the right is closer to what one would have seen, and does not have the unnatural tint like the first.
GETTING THE CORRECT WHITE BALANCE
Thankfully, most modern digital cameras can automatically detect the color of ambient light and compensate accordingly, letting the photographer forget the complexities of White Balance. However, they may fail on occasions like in the case of picture of the rock above. In such occasions, it is necessary to make manual settings in the camera to ensure that the white balance compensation is correct.
Besides the auto white balance, most cameras provide some default white balance settings, such as ‘indoors’, ‘daylight’, ‘tungsten’, ‘cloudy’ and a few more. Make sure you check your camera manual and understand how to change these settings. Only in cases when you notice that auto white balance is not performing up to the mark and creating color casts, try to change the white balance setting depending on the environment you are in. Most of the times it should work well and reduce the color cast.
UNDERSTANDING COLOR TEMPERATURE
The hue of the ambient light, often called ‘Colour Temperature’, is measured in Kelvins. Neutral daylight is said to be at 6500 Kelvins, or 6500K. Anything less than 6500K is usually bluish in colour (also called cooler tones), and above 6500K tends to be yellowish (warmer tones). Some cameras let you define the exact colour temperature of ambient light, which allows perfect compensation. If you are shooting RAW images, the same correction that is set in camera can also be performed in RAW image processing software. This means if you are shooting RAW, it is not necessary to give significant importance to setting the white balance, as it can be corrected later.
If you are shooting jpg however, it is important to ensure that White Balance compensation in the camera is working well. It is difficult to make corrections after the picture is taken.
IMAGE REVIEWS
The image below is posted for review by flickr user Meghana Behere
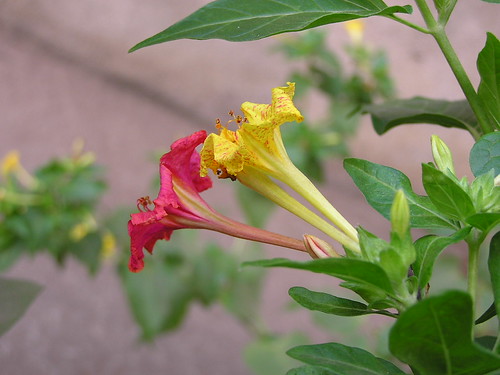
What charmed me instantly to this picture is the different colours of the two flowers that otherwise look the same. The composition at an angle beginning from bottom-right corner works well for the image. The leaf on the top works like a loose frame and helps viewer’s eyes to focus on the flowers. There are two areas where I feel the picture could be improved. The first is the background: the mix of blue and yellow in the brownish background are a disturbance and doesn’t go well in the frame. Second, the flowers are best shot when they are in full bloom. I am not sure if the flowers in the picture are wilting already or that’s how they are in bloom, but I feel the picture would have looked better if the petals were young and not bent.
The second picture for review is posted by flickr user rajolisudhir

As I can guess from the picture, the primary focus of the image is the ficus tree and the water body. There are a few distractions in the image, like the house to the right, men standing and the blue plastic sheet on the ground. I feel it would have been better to go closer to the tree and eliminate these distractions. Shooting from a location to the right also would have helped. Personally I would prefer to go very close to the subject in a scene like this and eliminate all distractions, including the sky which is bare and white at this moment. For my suggested composition, go to the image page and see the notes.
If you would like to have your images reviewed to know what worked well and how it could have been improved, choose some of your best images, post them on group pool of India Travel and Photography and tag them as itpcritique. You can also post your questions related to photography as a comment to this post or in India Travel and Photography group discussion. I will answer them in next week’s article.
