Travel Photography: Protecting Your Camera from Rain
The weekly travel photography section is back again, after a short two-week gap. Read all earlier articles in the series here.
As always, the Travel Photography article has two sections. The first part of today’s article is about protecting your camera in the monsoon season. The second part contains an image review. If you would like to have your images reviewed to know what worked well and how it could have been improved, choose some of your best images and post them on group pool of India Travel and Photography. Don’t forget to tag them as itpcritique, so they can be chosen for review. You can also post your questions related to photography as a comment to this post, or in India Travel and Photography group discussion. I will answer them in next week’s article.
In my earlier post on Photographing The Monsoon, Shrinidhi left a comment saying, “pls add some tips on how to protect the camera in rainy season- My fear that camera may get damaged due to water entry forces me not to take out the camera if it is likely to rain.” I would have liked to treat it as a Q&A at the end of an article, but the topic was worth a separate post in itself. Here it goes.
PROTECTING YOUR CAMERA FROM RAIN
Fungus. One of the biggest problem that haunts camera lenses is not caused by the rain itself, but the damp weather. If you keep the cameras and lenses packed away in the closet and wait for the monsoon season to end, you may be surprised to see fungus growing inside the lens. Fungus in the lenses is usually a grey fibrous material that slowly spreads in the inner surface of the lens. It grows in moist weather when the lens is stored for prolonged duration without exposure to light. The simple solution to keep fungus away is to keep using the camera often, instead of tucking it away in a closet during the monsoons.
If you do happen to notice fungus growing in the lens, do not panic. A little bit of it doesn’t make a significant difference to image quality. If you explore the lens to light frequently, the growth of existing fungus will be stunted. If it hasn’t spread too much, fungus may even shrink a bit on continuous exposure to light. But if there is a lot of fungus on the lens surface, it may be time to take the lens to a service center.
Using camera in the rains. I would not go ahead and ask you to expose your cameras freely to the rain, but at the same time, there isn’t a need to worry too much about precipitation. Most cameras are robust enough to let you shoot for a short while in a drizzle. But when you do that, ensure that you wipe the camera free of all the raindrops when you are done shooting. Do not let the water droplets linger on the surface. Don’t stay in the rain for long enough to get the camera completely wet. If you do, water could seep deeper into the body. Avoid exposing the camera in heavy rains. In case you get into a situation where the camera is accidentally prolonged to rains for a long time (or has fallen into water), remove the battery immediately and leave the camera for drying in a warm place. If you are lucky, your camera may function properly again.
Plastic bags. If you are going for long walks or treks in rainy days and intend to carry the camera with you, wrap it in multiple layers of plastic bags, or in a ziplock bag. It can keep your camera safe even if you are getting yourself wet in the rain. That way, when you reach a beautiful location and if the rains have subsided, your camera is dry and ready to work for you.
IMAGE REVIEW
The image below is posted for review by flickr user Guzman Sanchez
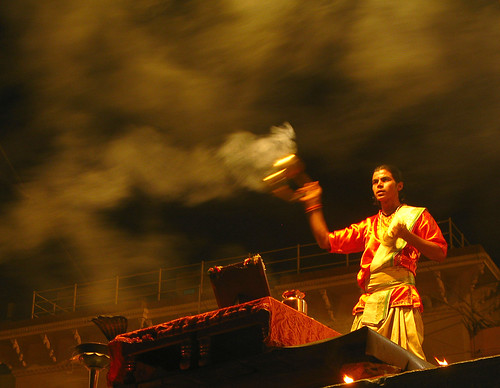
I am struggling to find areas for improvement in this image. There aren’t many I can think of. The positioning of the performer at the right side corner, with smoke moving towards the left works very well in the photograph. Despite being shot at a very low shutter speed(1/5 sec), the image seems to be sharp. The blurred hands are effective in showing motion. The streak of smoke on the top adds well to the image too. The image conveys the overall atmosphere very effectively.


