This Thursday’s travel photography article has two sections. The first section is a tip on enhancing the image with careful choice of background. In the second section, let’s take a few images submitted for critique on India Travel and Photography group, and discuss about what has worked well and how they can be bettered. If you would like your images to be reviewed, add them to India Travel and Photography group pool on flikr and tag them as itpcritique.
UNCLUTTERED BACKGROUND
Most images we take tend to have a distinct foreground and background. The image of a person in the street would have the person as the main subject, with the street and buildings as background. A bird’s picture might have a perch or leaves as the background. In occasions where there is a choice, it pays to compose the image carefully in such a way that there is not too much of background clutter. A uniform or simple background keeps the viewer’s eye focused on the main subject and enhances the it considerably.
Let’s begin with an example, and then look at ways achieve this.
The Grey Tit in the first picture below is an image that would have normally made me happy. The bird is well in focus, and has taken significant portion of the frame. The feed in its beak adds well to the image. These are things that I would have liked in a bird shot. But the clutter in the background obviously doesn’t gel well with the foreground, causing undesirable distraction.

In the second image below, the clear background emphasizes the subject and doesn’t strain the viewer.

The same goes with the images of Golden Langur below. The background in the second image is a tree trunk. Since the trunk as dark, and was in shadow, it appears completely black.


So how do we go about improving the background? A few tips here.
1. Always keep a watch. Despite understanding that a good background can make a lot of difference to the image, we do not remain conscious about it all the time. Unlike the camera, our eye can easily focus on the subject and ignore the background. So the clutter in the background is not intuitively recognized at the time of shooting. One needs to keep a watch and consciously observe the background before taking the picture.
2. Use a contrasting environment. In the picture of the flower below, the flower was directly in sunlight, but the ground below was in darkness. I took the image from an angle such that the background of the image is in shadow. It helped highlight the flower and keep the background from interfering. Use such contrasting light in the picture where possible. In a better controlled environment, you can use contrasting colors (such as red background for a blue foreground) to create similar effects.

3. Throw background out-of-focus. If your camera allows you to set the aperture, you can shoot with wide open aperture to blur the background. This may not have an effect as good as a contrasting environment, but still helps a great deal in enhancing the foreground. Similar effect can also be achieved with a lens that has a high optical zoom, by shooting at longer focal length. The picture below was shot with a 400mm lens and wide open aperture. As you can see, the flower is the only object in focus. Although we don’t have a very clear background, the flower manages to stand out, since the background is out of focus.

IMAGE CRITIQUE
Below is an image posted for critique by flickr user shande
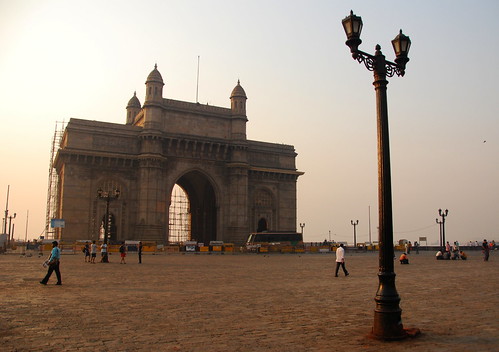
What I really like about the image is the way it is composed. There would be million pictures of Gateway of India where you see just the monument alone. In this picture, the photographer has thrown the monument to a side and has put an interesting deviation in the form of a pillar to fill the gap to the right. Yet, a viewers eye doesn’t stand for long at the pillar, and is easily lead to the monument itself.
Where I do feel that the image can be improved is in the lighting. This was shot in the morning light(as the timestamp on the image says) when the sun is already a little high and harsh. The sky to the left is slightly burnt. Also, sunlight is lighting a side and the back portions of the monument, and the front portion is in darkness. A better result would have been achieved, if the picture is taken in the evening. From the looks of it, it seems like sunlight would fall on right side and front portion of the monument in the evening hours, which would highlight the monument better.
The scaffoldings are obviously an eyesore, but not much can be done about it except coming back on another day. Here is an article I wrote on workarounds I tried with scaffoldings, which may be of use.
The image below is posted for critique by flickr user mihirrly
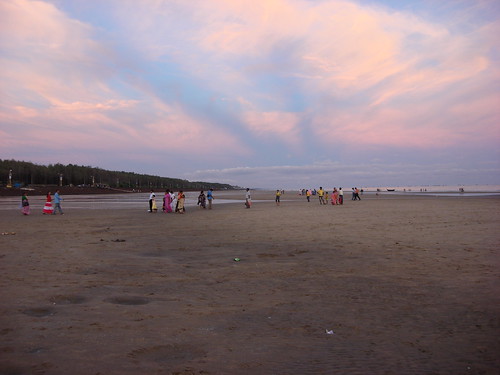
The colors of the evening sky stand out well in the picture. The image effectively conveys the feel of a wide beach where people come to relax. I feel that the shot could have been recomposed to remove a bit of the bottom portion of the sand which is not of much interest. It would also add to the image, if it was taken from a place where more of the sea could be included in the image.
If you would like one of your image reviewed next week, add it to India Travel and Photography group pool on flikr and tag them as itpcritique.
The second in the series on Thursday Travel Photography Column, discussing on the importance of early morning light.
Join India Travel and Photography group on flickr.
I have created a group on flickr, called India Travel and photography for discussions on travel and photography, and to share images and travel stories. Please join the group and share your images from recent trips, and possibly your travel stories along with images.
From next week, I intend to critique one or two images every week as a part of Thursday Travel Photography column, explaining how a photograph can be bettered and/or what makes it stand out, highlighting the technicals and aesthetics related to the image. To have your images critiqued, add your images to the group pool and tag them as itpcritique.
Waking up early in the morning is critical for getting good outdoor shots, especially when you are shooting landscape images. The soft light of the morning hours just before and during the sunrise can bring life to a scenery that may look flat in later hours of the day.
On a cloudy day or in clear summer days, the light just before the sun comes out tends to have a blue tint that works well when you are shooting in mountain landscapes, beach side or other open areas. In winters, the early morning sun on clear days tends to have an orange hue that can bathe the landscape in glorious colors. A gentle fog in the morning can diffuse the light and create magical effects in the landscape, highlighting the contours of the mountains and removing excessive details from the scenery. A few examples:

What could have been an ordinary image of wild grass is transformed into a colourful frame in early morning light, on a winter morning. But such brilliant colors may not occur in summers.

The mild fog in the morning hides the finer details of the plains and highlights just the contour of the mountains in this picture. Also notice the blue tint in the entire frame, which will not occur in the later hours of the day. A similar shot, made in the afternoon would be full of details of the plains, and the emphasis on the hills would be completely lost. Also, the image would have a dull color and would look very flat.
Another important character of the morning light is the angle of the incident light. Because the sun is close to horizon and the light is not harsh, sunlight casts mild shadows in depressions in the landscape. Shadows created by such lighting (normally called side-light) help highlight the texture of the subject and show the depth and help visualize the third dimension in the photograph. Contrary to this, afternoon sun has equal intensity in all areas, be it depressions or crests, making the scenery look flat and two dimensional. Where the afternoon light does cast shadows, the shadows tend to be harsh, which form completely dark areas in the image, making the picture look ugly. An example.

In the image above, which was shot in early morning hours, the distinction between each layer of mountains is clearly visible, and there is a depth in the image. However in the picture below, which was shot in the same region but in later hours of the day, distinction between the layers of mountains is not as prominent, and the image is not as appealing as the one above.

If you are shooting wildlife, there is another advantage besides the quality of light. Birds tend to be less active in the morning hours and are easier to shoot. You can find some birds, and animals like monkeys in a close huddle in winter mornings, which makes them look appealing, like in the image below.

To ask me any questions on morning light or other aspects on photography, to start a discussion or share your images related to the topic, join India Travel and Photography flickr pool, add images and start discussion threads.
Starting today, India Travel Blog will feature a column on Travel Photography every Thursday. This column aims to help amateurs as well as keenly interested readers to hone their photography skills, and enable them to take better pictures when travelling. Besides providing simple, helpful tips on getting good pictures, we will also touch on simplest post processing techniques, managing images and other aspects that needs to be addressed after taking a picture. We will also feature a way to have one or two images critiqued every week, and one or two questions from the readers answered. Welcome to the column – ‘Thursday Travel Photography’. Comments and feedback welcome.
I posted a short write up on ‘10 tips to get good images‘ on Club Mahindra Blog a fortnight ago. This week, I was hoping to take up each of these 10 tips and explain in depth about how to get the best from it, using examples. When I was looking back at the write-up today, a comment from Kalyan caught my attention. He said:
“…I get scared of the 3rd tip [about shooting people]. I mean ’shooting’ children is easy but adult strangers! I get too jittery to ask. Hope you write another post on – 7 tips on how to ask ‘May I click your photograph’?”
Let’s talk about this in today’s column.
There are two lines of thinking about getting permission from people when taking photographs.
First, that it is important to take permission before taking pictures. By shooting a person without taking his or her permission, we would be invading their privacy, and it is not right to take a picture against their wish.
Second, that a good image can’t be shot when you request for permission. You may be denied permission in the first place. And even if you are allowed to, you still can’t get a candid image of the person being photographed. He or she becomes conscious of the photographer and the mood of the moment will be gone.
It is difficult to deny both streams of thought. It is important to respect someone’s privacy, and at the same time it would nice to catch the mood of the moment perfectly. Every photographer will have his own views on this, and it is hard to say which is right. Personally I follow a middle ground between the two and choose my action depending on my location, and general attitude of people about being photographed by strangers. While I find it important to respect someone’s privacy, I do go ahead and shoot without asking in places where I find it likely that people are not apprehensive about their picture taken.

I asked this baba’s permission before taking his picture. He was glad to consent, but as soon as I asked him, he became conscious. He was casually chatting with people around him, but suddenly stopped, adjusted his headgear and posed for the camera stiffly. The mood of the moment was gone.
Women in mountain regions of India(such as Himachal, Sikkim, Arunachal) prefer not to be photographed by tourists, and shy away when they see a camera pointed at them. People from globalized societies, such as in big cities, or most people who are aligned with modern ways of living prefer not to be photographed from strangers. However, as you go into smaller places, people are likely to be more open and do not get disturbed by photographers. Some may even be delighted to get photographed, and will be glad to pose for the camera.

I did not ask him for permission to shoot. But I was standing in front of him not very far away, and he was well aware that I was shooting him. I spent a few minutes wandering in the area before getting this picture.
I avoid photographing people altogether in the first case where people are apprehensive to getting photographed. There would be a few occasions when a great photo-opportunity would have made me break this self-imposed rule, but I have always regretted it more than having enjoyed the process. When I was travelling in the tribal village of Dha and Hanu in the Indus Valley of Ladakh, elderly women frequently asked for money to get photographed. Since I was not keen to pay, I avoided taking pictures but could not resist in some occasions when I saw them walking in front of me wearing their tribal clothing. I requested a lady to pose for a photograph, and she consented, but asked for some money after the picture was taken. I politely refused and moved on, and she did not seem to mind much. But when I took a picture of another lady a little later even as she was far from me, this time without asking for permission, she was clearly upset and did not hide her disapproval. She asked for money, and was not happy when I refused. I managed to get away, but felt guilty about having taken the picture without her approval and deleted it soon after.

This lady from Dha Village agreed to be photographed. But another lady I met after her was unhappy about her picture being taken without her consent. I deleted that image.
While I tried taking pictures in Dha-Hanu, in many such occasions when I have seen people unwilling to pose either due to privacy concerns or for any other reasons, I have resisted the temptation to shoot. I rarely shoot people in areas of cities where people may not be keen to get photographed, and have let go some good opportunities on realizing that people may not be keen to get framed. But if people are not a prominent part of the scene, I do not have two minds about going ahead with my shot.
At the same time, I have taken some additional measures to get a picture when I really wanted it. Driving through Himachal’s Kinnaur Valley, we saw two beautiful women walking by, wearing traditional caps and necklaces on the way. Knowing that they would never be willing to get photographed, we requested our driver – a talkative person who knew the way of locals, to talk to them and ask for their consent. He did manage to get their permissions and we quickly took a few shots. In another incident, I was keen to get images of a woman weaving a jasmine necklace in Madurai, who asked for some money to be photographed. This time, I obliged and paid her to take a picture.
In places where people usually do not mind being photographed, such as in rural areas, in parts of Rajasthan or Ladakh, I have simply gone ahead and photographed people without asking their consent. I must admit that the best of my people images comes from such places, but I also feel that it is not right to go out of way to get those best shots. In such occasions, while I don’t make it obvious about taking their pictures, I consciously avoid hiding from them as I shoot.

I shot this picture during a festival in a monastery in Ladakh. There were a large number of photographer-tourists around me taking her picture. She was well aware that she was being photographed. While it is impossible to say if she was okay about being photographed, she did not appear upset about it, nor did she disapprove.
When you do ask for permission to shoot, talk to them casually and spend time with the person you are shooting and make them comfortable first. Take a few sample images initially, until they start getting used to the camera, or ignore it altogether. It is then possible to take images of the person without getting him or her conscious. It is much easier with kids who become friendly quickly and will be happy to be good subjects for the camera. I usually try talking to children who eventually become comfortable and do not remain conscious of the camera for long.

It is easy to break the ice with children.
To conclude, I don’t think there is an easy and perfect solution to the problems of shooting people. At the same time it is important not to break into anyone’s privacy and go out of the way to get the best shot. When you do ask for permission, spend time to break the ice before getting your picture.